Sunday, December 20, 2009

Canadian Bacon Mini Crustless Quiche

Well, sorry for the lack of posts lately.  I was just recently diagnosed with something called SIBO - Small Intestinal Bacterial Overgrowth.  So now I have to tweak my diet.  I was gluten-free before when my doctor thought I had Celiac.  That was a tough diet to stomach.  Now, I need to cut back on not only wheat, but sugar, artificial sweeteners, dairy, soy, and most starches as well.  I'm in an adjustment period and for now, I've been eating a lot of salads, fruits, and meats, so I guess that's a good thing!


So while I'm adjusting, I'll have to post some new recipes!

Today, I made these Canadian Bacon Mini Crustless Quiches! They are so easy, and make great leftovers.

My package of pre-cut canadian bacon came with 10 slices, so I made 10 mini quiches.
10 slices of canadian bacon
10 eggs
red peppers
shallots
chives
salt and pepper
havarti cheese
Those are the ingredients I used, but feel free to play around with any combo of veggies, cheese and herbs you have on hand.
Preheat your oven to 400 degrees. Spray a cupcake tin with some spray oil. Cut slices, about 1/2 inch, along 4 sides of the bacon. Place a slice of bacon into each muffin cup. These don't need to be perfect. Place your veggies on top of the bacon. I sauteed mine slightly, but you don't have to. Then carefully put an egg into each cup. Top with some herbs and put in the oven for about 15-20 minutes, depending on how firm you like your eggs. Top with cheese, salt & pepper and voila!

Wednesday, December 9, 2009

Faux Turtles

These are the easiest, tastiest chocolate treats you can make!  They're salty and sweet.

Ready for this?

Buy Rolos.  Buy those square, grid pretzels.  Buy some nuts or M&M's.

Preheat your oven to 350 degrees.

Place the pretzels on a baking sheet and top each with a Rolo.

Pop these babies in the oven for 2-3 minutes, or until the chocolate looks shiny.  Take them out of the oven and immediately top them with nuts or M&M's or whatever you fancy.  You can also top them with another pretzel to make a pretzel-Rolo sandwich!


Let them cool completely before storing them,  If you try to move them while they're hot, the chocolate will get everywhere.


Saturday, December 5, 2009

Cook's Illustrated Apple Cake

I came across a picture of this cake when I was surfing the food blogs.  I found it was a recipe from Cook's Illustrated.  Most Cook's Illustrated recipes are only available to paying members of their site.  Luckily, they have a free 2-week trial.  So I signed up and grabbed as many recipes as I could find.


So, Cook's Illustrated Apple Cake can be found here for those you pay, or want to try it out free for 2-weeks.  Did you know, Cook's Illustrated, Cook's Country and America's Test Kitchen recipes are developed right here in my state of Massachusetts?  Actually, in the town next to where we live, Brookline!    I even did some cat sitting for someone who works there, and I'm very jealous of her job.  But I digress....

The first step to making this apple cake is to butter and sugar your bundt pan and add a layer of brown sugar at the bottom.
Next, chop your green apples, toss them with some more brown sugar and layer them on top of the brown sugar already in the bundt.  You could also toss the apples with some cinnamon.
Next, combine your dry ingredients, and your wet ingredients.  This recipe uses cake flour, which gives the cake the texture of a pound cake.  The batter is very thick.
And then bake!  I had a hard time figuring out if this cake was done, since the middle still looked a bit loose even after 45 minutes.  Once it's done, you're supposed to immediately invert the cake onto a foil-lined baking rack.  Well, this part wasn't so easy!  Part of the apples and cake stuck to the bundt!  I think perhaps it had something to do with sugaring the pan??  Either way, it smelled delicious, like a warm apple pie.
I just picked the stuck-on pieces out of the pan and put them in the middle of the cake.


After the cake cools completely, top it with some confectioner's sugar.  I also made some Brown Sugar and Bourbon Cream to be served alongside.  I have to say, the cake was good, but very sweet.  The Bourbon Cream, which is made with sour cream, gave it a nice tang to cut the sweetness.  The cake was good the day it was served, but the leftovers weren't so great.

Here's the recipe for the Brown Sugar Bourbon Cream - Printable Recipe

Thursday, November 26, 2009

Happy Thanksgiving

What's on your menu?  Today, I'm cooking:


*Cook's Illustrated Apple Cake with Brown Sugar Bourbon Cream
*Classic Corn Pudding with Cheddar and Chives
*Garlic Mashed Potatoes with Smoked Gouda and Chive
*Turtle Pretzel Cookies


A full report after the holidays!


I wish you all a happy, healthy Thanksgiving!!


p.s.  Am I the only odd one who doesn't eat turkey?

Wednesday, November 25, 2009

Baked Manicotti from Cook's Illustrated

It's a fact.  I love pasta.  Even more, I love baked and cheese filled pasta.  When I saw the recipe for Baked Manicotti from Cook's Illustrated, I wanted to give it a whirl.  You can find the recipe here if you are a paying member of the site.  But you can also sign up for a 2 week trial of the site.  I find their site to be very helpful with loads of cooking instructions including video, recipes, equipment and product reviews.

The first step is to make the sauce using canned, diced tomatoes, garlic, seasonings and olive oil.  The sauce is very watery, which I was concerned about.

The next step is to take the no-bake lasagna noodles (Cook's Illustrated prefers Barilla) and soak them in boiling water for 5 minutes.  After the noodles have soaked, lay them individually on paper towels.  Then you can begin to fill them. 

The filling is made up of eggs, ricotta, parmesan cheese, mozzarella cheese and more seasonings. 
Spread about a 1/4 cup of the cheese mixture onto the lasagna noodle leaving about a half inch at the top.
Then, roll it up tight!

Place the rolled up manicotti into a 13x9" pan that has some of the sauce mixture on the bottom.


Once you've rolled them all, pour the rest of the sauce mixture over the top, making sure to completely cover the manicotti.  Cover with foil, and bake in a 375 degree oven for 40 minutes.  Then take the foil off, top with more cheese and broil until bubbly and browned on top.

And remember how I was worried about the sauce being too watery?  Well, thanks to the magic of the no-bake noodles, the water is absorbed making a perfectly al dente noodle!
This makes a ton of manicotti.  We had 2 dinners and I had 2 lunches out of 1 batch!  I think these would freeze nicely for a make ahead meal.

Monday, November 23, 2009

Tea at the Four Seasons

Ever since my friend and I visited London for the first time back in 2001, I've enjoyed spending an afternoon having high tea.

My first experience was at the Ritz in London.  I wish I had some of those photos online, as nothing can compare to it! 

Over the years I've been to quite a few afternoon teas around Boston.  I've liked them all for different reasons.  There is a new cupcake tea at the Ritz in Boston, which I'd like to try sometime, but this weekend, my husband surprised me with tea at the Four Seasons.

Afternoon Tea at the Four Seasons is held in the Bristol Lounge, which overlooks the Boston Common.  It's a beautiful setting, and perfect for an afternoon tea.

To start off, we decided to have the Royal Tea, which comes with a glass of Kir Royal.

Nothing like a little bubbly on a Saturday afternoon!

For our tea selection, I chose the Black Currant, which is Black Tea Infused with the Delectable Fruitiness of Black Currant and Dried Fruit Added.  My husband had the English Breakfast – Orange Pekoe Black Tea, Well Balanced and Bright with an Apricot Fruit Flavour.  We both really enjoyed the Black Currant.  It had a sweet and mellow flavor.

For our sandwiches, we had curry chicken salad, cucumber with Boursin and watercress, and a shrimp mousse.
I opted for an extra cucumber salad, since I don't eat seafood.  My husband thought  the shrimp mousse tasted very fishy, and they were kind enough to bring him an extra cucumber sandwich as well.  I enjoyed the cucumber sandwiches, but I did think the bread was a little on the stale side.
And no Afternoon Tea is complete without scones and clotted cream!  They served cranberry scones with Strawberry Jam, Lemon Curd and Devonshire Cream.  I don't know what they put in that cream, but it's divine!  The proper way to eat it is to mix the strawberry jam and cream together.

We also had a selection of 3 different desserts.
 We had one pecan bread tart, a mini cheesecake and a lemon curd shortbread.  I really enjoyed the cheesecake.
Next time I'd like to try that cupcake tea or perhaps the L'Espalier's Fantasy Tea.

Friday, November 20, 2009

Huffy Puffy

You heard that right.  Huffy puffy, or otherwise known as a Dutch style pancake.  This pancake is light and fluffy and ridiculously easy to make.  Have it for a nice breakfast or dinner.

Heat your oven to 450 degrees.  Place a nonstick skillet on the middle rack and pre-heat it for 10 minutes.

Meanwhile, get your ingredients ready.
You can top your huffy puffy with anything you'd like - syrup, vanilla sugar, cinnamon and sugar, etc.  I adapted the idea from Joy the Baker to make an orange sugar combination, but I used vanilla sugar.

If you go this route, zest an orange and mix it with your sugar.
Now mix the rest of your ingredients, excluding the butter. Your batter will be very thin.

You can use any flavorings you'd like.  That's part of the fun!  Try some vanilla extract and cinnamon this time, and next time try some almond extract and nutmeg.  Anything goes.  This time around, I used Penzey's Cake Spice and vanilla extract.

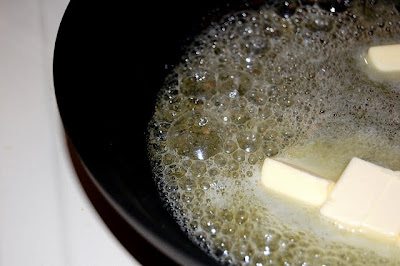
Once your batter is ready, get your pre-heated skillet out of the oven.   Drop your butter into the hot pan and let it sizzle! Swirl the butter around the skillet. 
Once that butter is melted, pour in your batter.  Make sure you keep that oven mitt on! Don't forget that skillet is HOT! Put the skillet back into the oven and cook for 15-25 minutes, or until nicely golden brown.

While it's cooking, sneak a peak into the oven and check out how your huffy puffy puffs!
Take it out of the oven and top it with your favorite topping.  You could try: powdered sugar and cinnamon on top, maple syrup, fresh raspberries or sliced strawberries, or sauteed apple slices.
I served this alongside some scrambled eggs.
Isn't it pretty!!

Wednesday, November 18, 2009

Nespresso

My friend Jen introduced us to this fine gadget.  My husband and I knew we had to have one!  We have the Nespresso Essenza with the Aeroccino automatic milk frother.  Sure, it's a bit pricey, but not anywhere near as expensive as making a Starbucks run on a daily basis. 


There are a few drawbacks.  It only uses Nespresso pods, which can only be bought on their website, on Ebay, or at one of their boutique stores.  There's a store on Newbury St. here in Boston and when we first bought the machine, I went there and purchased their starter kit.  It comes with a lot of coffee, but at no small price!  Each capsule ranges in price from .55 to .62 cents each.  Often there are specialty flavors that come out and they sell out quickly.   The starter also came with a capsule presentation case.

The milk frother is a fun attachment for making lattes and cappuccinos, but it makes a small amount at a time.  You have to wash it out in between uses as the milk tends to burn on bottom.  So it wouldn't work well with a large crowd.  I think since we purchased ours Nespresso came out with a larger one.


Either way, having worked at Starbucks, I know my way around an Espresso machine and can whip up a caramel macchiato in no time!  Macchiato actually means "marked", and in this case, it means to "mark the foam."  Your shot of coffee should be poured over the already steamed milk.

Jenny's Caramel Macchiato

In a mug, measure out some vanilla syrup to your liking.  I usually use about 1 TBLS, but I don't like mine too sweet.  Pour in your steamed milk.  No need for anything fancy, you can heat up a little milk in a saucepan.  Brew your espresso shot and pour it over your milk.  Top with caramel sauce and voila!


Tuesday, November 17, 2009

Baked Chicken Taquitos and Cilantro-Lime Rice

I love Mexican food.   Many recipes are pretty easy to make at home, though I haven't quite been able to master the burrito.  Those always taste better at a restaurant.  But I have perfected rice that can rival the one at Qdoba any day!

These taquitos take a little patience to make, but I promise you, they're worth it.

Baked Chicken Taquitos  (adpated from ourbestbites)
printable recipe
For filling:
1/3 cup (3 oz) light cream cheese
1/4 cup green salsa
1 T fresh lime juice
1/2 t cumin
1 t chili powder
1/2 t onion powder
1/4 t granulated garlic
3 T chopped cilantro
2 T sliced green onions
2 C shredded, cooked chicken (you can use rotisserie, or marinade and cook your own)
1 C grated light cheese - I use a Mexican blend

16 small corn tortillas
kosher salt, for sprinkling
cooking spray oil

Line a baking sheet with foil and spray lightly with cooking spray.  Heat your oven to 425 degrees.
Soften the cream cheese in the microwave for about 20-30 seconds.  Mix all ingredients well.

Now for the hard part.  You want to work quickly when heating and filling the corn tortillas as they tend to crack easily.  Your best bet is to cook no more than 2 tortillas at a time.  Cover the tortillas in a dampened paper towel and cook for 20 seconds. 

Fill the bottom 3rd of the tortilla with about 2-3 T of the filling and roll tightly.  Place the rolled taquito seam side down on the foil-lined pan. When finished, spray lightly with cooking spray and sprinkle with kosher salt.

Look, mine are far from perfect.  They've got cracks too.  Don't worry about it.  They taste awesome anyway!
Bake for 15-20 minutes, or until the edges are brown.

I like to serve this with Cilantro-Lime Rice with Pineapple, green salsa and some guacamole.

Lime-Cilantro Rice with Pineapple
also adapted from outbestbites
printable recipe
1 cup dry white rice, cooked in 2 cups of water.
2 T real butter
juice from 1 lime - and additional for garnish
1/2 cup pineapple tidbits (or more for your tastes)
1/2 cup chopped fresh cilantro
Salt and pepper to taste

Cook your rice.  When it's done, toss in the butter.  Add juice from 1 lime, pineapple tidbits and cilantro.  Serve immediately.  I also like to serve it with an extra lime wedge for squeezing a little extra tang!

Enjoy!

This post is linked back to Simply Sugar and Gluten Free

Sunday, November 15, 2009

Crushed Potatoes

I don't even know where I first saw these, but I've only recently started making them.  I'm seriously addicted.  These have become my new favorite way to make potatoes.

Boil your potatoes until they are fork tender.  Spray a pan with some olive oil and place your potatoes on it.

Take a potato masher (a fork should work too), and crush the top down lightly.  Then rotate the masher and crush the top again.


Sprinkle the potatoes with kosher salt, pepper and any seasonings you'd like.  I prefer rosemary, when I've got some on hand.


Spread some olive oil over the top.  Bake in a 450 degree oven for about 25 minutes or until browned on top.


They come out crispy on the top, and soft and buttery in the inside.  Delicious!!

Friday, November 13, 2009

Cheese Review: Humboldt Fog

I'm turning into a Cheesemonger.  I'm learning to love the moldy delicacies.  On my trip to San Francisco, we had a few cheese plates.  Of the many we ate, only a few stood out.  One was a goat cheese called Humbolt Fog.  It's a soft, creamy ripened goat cheese with a layer of vegetable ash running through it.  It looks slightly like a cake when sliced just right!  It's mild, but slightly tangy.  I never thought I'd see this cheese again....

But our new Whole Foods in Dedham, which happens to be the largest in New England, has a walk in fromagerie!  And then I saw it.  My deliciously creamy Humboldt Fog.  For a measly $21.99/lb.  And that wasn't even the most expensive cheese.  I bought myself a quarter of a pound.  Yes, I paid $6 for a small piece of heaven.


I like to eat this cheese plain, but you could serve it with a crisp pear, a little honey and some white wine.  Now that's a tasty snack!

Do you have any favorite cheeses?

Wednesday, November 11, 2009

Eating my way through San Francisco - Part 4

The final full day.  We decided to hit up some of the places we saw on our Mr. Toad's Tour for a more in depth look.  Today was also the first day we saw the infamous San Francisco fog.  We had been very lucky with the weather and it was sunny every single day.  The fog brought a damp coolness to the air.  It was actually kind of refreshing.

Our first stop was in Chinatown.  San Francisco's Chinatown is the largest Chinatown outside of Asia!  It was buzzing with activity. 

We stopped in a few grocery stores and shops.

There are always so many interesting finds in Chinese grocery stores.
On one side of Chinatown is North Beach, which isn't a beach at all, but rather the Italian section of San Francisco.  We were slightly hungry, so stopped in for a slice of pizza at L'Osteria del Forno.  It's a tiny restaurant, but they make each slice of pizza to order.  It's nice knowing your slice hasn't been sitting around all day.  We were first served some warm and tasty focaccia bread.  I ordered a slice of TRE FORMAGGI, which is made with imported gorgonzola cheese, ricotta, mozzarella.

It was divine.  I loved the gorgonzola on my pizza!

After this snacking interlude, I went a few doors down to La Boulange Bakery.  You know I'm a sucker for those French Macarons!!  I had to try these too. 

I have to say, these were pretty damn good.  The flavors were much stronger than the ones from Miette.  The caramel flavor was my favorite.  Light and crispy with deliciously creamy caramel in the center.  My only complaint is they were cold.  I couldn't wait for them to be at room temperature.  I gobbled them up in 5 minutes.  The menu at La Boulange looked wonderful as well.  Why can't we have one of these in Boston??

I'm not going to lie.  Today was an all out eat-fest.  It was our last day and we truly made the most of it.   After already consuming a slice of pizza pie and a few macarons*, we headed back to the Ferry Building Marketplace.  While strolling along, we were drawn into The Ferry Wine Merchant.  We spotted a platter of cheese and meats and had to go in. We ordered a small platter of cheese and one of meat along with a half carafe of wine.

I don't even know what kinds of meats and cheeses we were given.  I loved every one of the cheeses, but the meats weren't my thing.

I must mention, it was also Halloween, so there was a lot of people watching going on!

  We lingered here for a while and then hopped on a bus over to the Castro.
 But while we were in the Castro, we were also close to 2 more foodie destinations I had to try.  First up was Bi-Rite Creamery.  I'm not gonna lie, but this had to be the best ice cream I've ever had.  I had Salted Caramel and it was a little scoop of heaven.  I just love anything salty and sweet all in one bite.  My husband had Balsamic Strawberry and was very impressed.  It was sweet with a little tang.

Now feeling rejuvenated, we headed back to the Castro for some more Halloween action.  We spent about 5 hours checking out the costumes. I'll post some here, but I'm afraid that many may not be safe for work, so these are a select few.


Ok then....

Next up was Tartine Bakery.  This bakery has won  a James Beard Award for Outstanding Pastry Chef.  They are also well known for their fresh baked, artisan breads.  We stopped in for dinner to try some of their sandwiches. 

I ordered Pecorino & Almond:
Sheep milk cheese & almonds crushed with olive oil, lemon, and sage

These sandwiches were huge!  While I liked the flavor and the bread, I thought it was very greasy.  It is an interesting combination and I'd never have thought to put almonds in my panini.  I may have to try a scaled down version of this at home.

My husband ordered the Pastrami:
Niman Ranch pastrami, Gruyère cheese, horseradish & Dijon mustard

The pastrami was very lean and tasty, but again it was very greasy.  And the Dijon mustard was over-powering.  Not a crowd pleaser, I'm afraid.
Feeling kind of ill at this point, we actually didn't buy any pastries.  Or maybe we just couldn't afford it after spending $30 on sandwiches!  But their pastries looked amazing.

And that ends our time in San Francisco!  I'd love to go back some day, but I'm afraid my wallet (and stomach) can't afford to do so!  I'll have to scour Boston for some artisanal, locally grown, sustainable and organic restaurants! :)

* Macaron is the correct spelling for a French Macaron.  In the U.S., our coconut goodies are macaroons.